Assess, Evaluate and Document All Digitally With Google Apps
Recently, I wrote a post summarizing and sharing my modification of the work shared by Alice Keeler & Jon Orr involving gamifiying standard based grading. Since I wrote that post, I have added a few new features to the Google Sheet I shared and have integrated a pretty convenient digital workflow to collect, review, assess and provide feedback in a timely fashion to my students.
Check out a quick screencast that outlines the work below. Don’t have time to watch? Check out the screenshots and brief descriptions below.
Digital Workflow: Collecting, Assessing and Providing Timely Feedback
Students Submit Work Saved in Google Drive via a Google Form
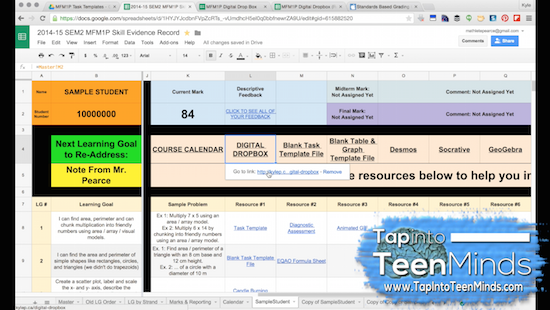
Students can submit work via a link to a Google Form called a Digital Dropbox (thanks again, Alice) on their individual skill evidence website:
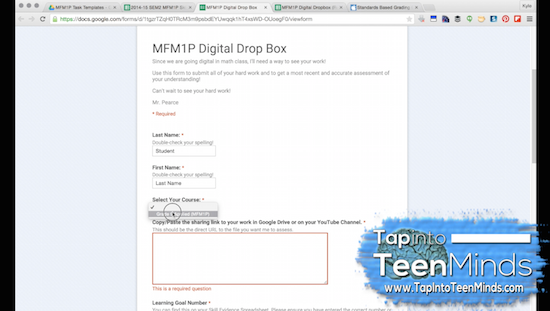
Filling In The Digital Dropbox Google Form
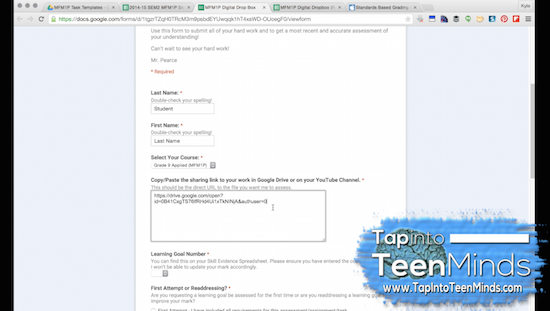
Students submit their name, course, and other details about the work they are submitting.
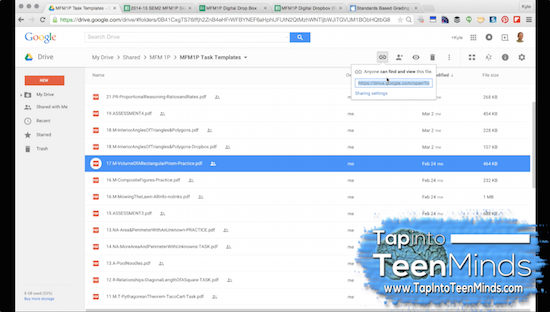
Students Copy The File Share Link from Google Drive
Students will jump into their Google Drive and copy the share file link. This can be done with any device including an iPad, Chromebook, Desktop/laptop, or smartphone. Students must either make the file accessible to those with the link or put it in a shared folder that the teacher has access to in order to be able to view the file.
Paste File Share Link into the Digital Dropbox Form
Students will paste the share link into the form.
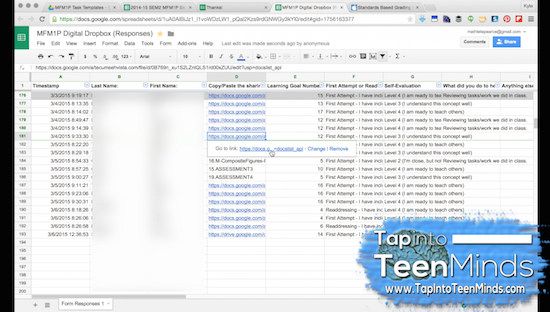
Access File by Clicking on Shared Link from the Form Responses Sheet
Teachers can then click on the link submitted via the Digital Dropbox Google Form in order to view the sheet and assess.
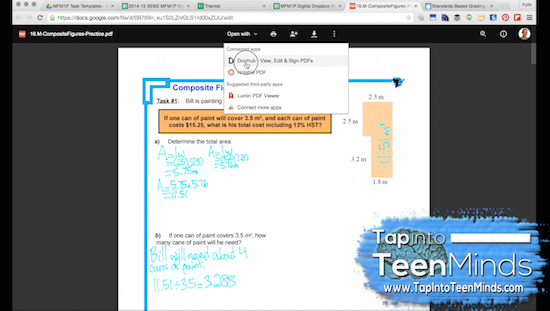
On a PC/Mac, Use Google Chrome and Open In DocHub
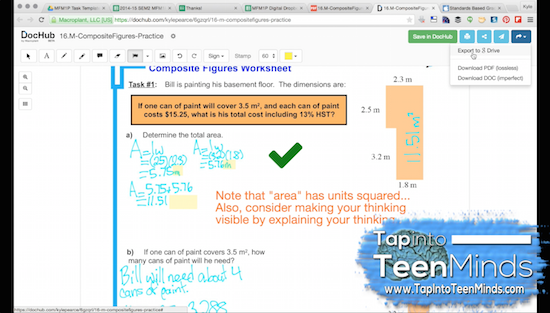
Using Google Chrome as your browser on any desktop/laptop, open the PDF file in DocHub which is a free Google Chrome/Drive extension.
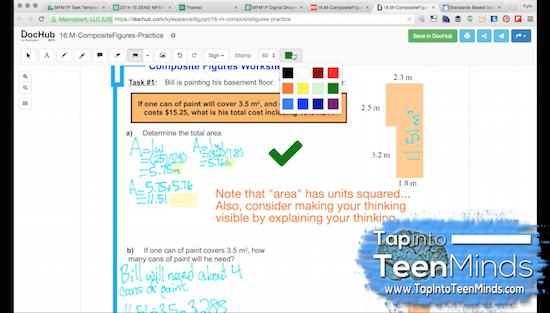
Annotate Using DocHub Tools
Lots of great tools in DocHub including ink, highlighter, stamps including check marks and flags, text boxes and much more.
Export DocHub File to Google Drive
Hit the blue button in the top right corner and select Export to Google Drive. You now have a new copy of this annotated PDF that you can then share back to students.
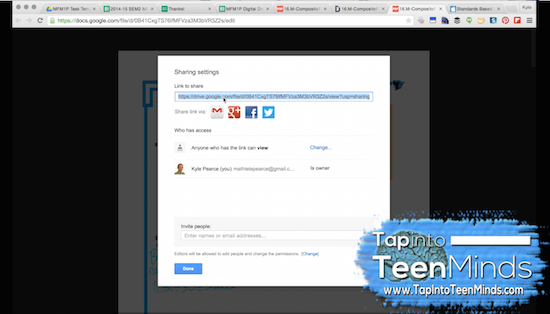
Make File Accessible to Those With The Link
Rather than sharing the file directly with a student, I change the privacy setting to “accessible to those with the link” so that I can simply share the link back and students can view their feedback.
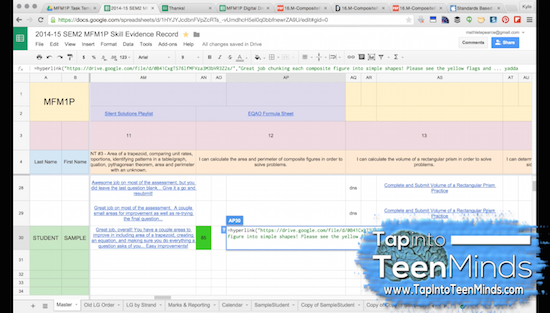
Paste Shared Link in Master Spreadsheet
By pasting a shared link to the feedback PDF file, students can access their feedback as soon as you’re finished and they can keep track of it in an organized manner.
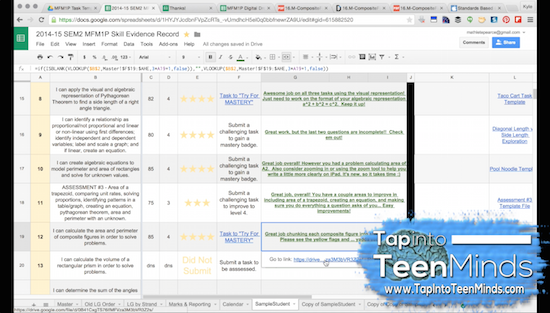
What It Looks Like To a Student
Here’s what a student sees when I share the link back to them:
This is a brand new workflow that I just started this semester, so I’m sure there are ways to make it even better. Please don’t be shy and share out any ideas you have for us…
WANT TO LEARN HOW TO TEACH THROUGH TASK?
Share With Your Learning Community:

About Kyle Pearce
I’m Kyle Pearce and I am a former high school math teacher. I’m now the K-12 Mathematics Consultant with the Greater Essex County District School Board, where I uncover creative ways to spark curiosity and fuel sense making in mathematics. Read more.
Read More From The Blog

Hi there. I started using the spreadsheet you adapted after your last post on this. It’s going fairly well except we don’t have 1:1 devices yet so the kids don’t always get their info in a timely manner. We are still a mix of paper and online which is OK. I used my personal gmail account but now I think that was a mistake because if they reply it comes into one of my personal accounts rather than my board email account. I need to transfer everything over to a new account. I think I can probably just make copies and share them with myself, yes? I have two questions if you don’t mind answering them or directing me to other posts (I know you must be really busy and get a lot of questions). 1. How do you make your worksheets? The ones that the students use. What program is it? 2. On some of my students’ tabs the “status” at the top (angle, quadrilateral, etc.) doesn’t fill in, even though badges have been earned it still says “no sides earned yet” – quick ideas on that? Or even a google search term to use would be helpful.
Hi @disqus_jws9Bq2QfP:disqus,
Awesome to hear that you’re giving it a shot! It sounds like you’re having your students submit work via email. If that is the case, I’d suggest a different strategy. Having students use a cloud-based service (Google would be ideal in this case), you’d avoid that hassle regardless of the Google account you personally use.
#1) When I create task templates, I’m using Apple Keynote software.
#2) Currently, the sheet has the movement from one title to another getting progressively harder. At first, 1 badge = title movement, while later, it will take you 2 badges, etc. You can modify this, but you’d have to modify the code a bit. Just an FYI that it is currently setup to do this in the sheet I’ve shared out. Many games do something similar where it gets harder to move up (or takes more work). Tried to emulate that.
Thanks for sharing! It look great! I am currently playing around with the spreadsheet in hopes of using it next school year in my classroom. However, I am having trouble getting the published “student” view of the spreadsheet to update when I change the master. I have made sure the automatically publish box has been checked but it does not update when using the published student link. Am I missing something??
Also, I am formatting noob and cannot seem to leave comments or link student work in the master while being able to put a “m” for a mastery badge. I seem to only be able to do one or the other. Is there a way to do both, leave a comment and a “m” for a badge?
The version you are using only has one column for both mastery and feedback. I have since updated this on my end. I need to add the most recent version to the original post. Will try to do this asap!
Hi Micah,
There is definitely a delay in student sheets updating. The way to get around this is by clicking on each student sheet so each student sheet refreshes and receives the new data inserted in the master. This is because the data is sent to the student sheets via a formula and the student sheet is not constantly checking for new data in another sheet unless you specifically load that sheet.
Complex? Sorry – hopefully that made some sense!