Is slow or no WiFi in your presentation room slowing you down?
Every presenter has been in the situation where they are stoked to try some new tech when delivering a workshop. Quite a bit of research, learning, and preparation has been invested into your presentation over the days or weeks prior. As you’re getting ready to “wow” your attendees with your innovative idea, you realize there is no WiFi signal in the conference room or such a weak signal that it is completely useless. Or, perhaps you’ve spent ages on how to choose the right TV, and have set up a comfy home studio to watch a show with your family, only to find yourself facing this same issue.
This situation doesn’t just happen to conference workshop presenters as it can also happen in the classroom. It takes quite a bit of resiliency and confidence in both the technology and subject area for a teacher to try new technology in the classroom. So much can go right, but so much more can go wrong.
If you plan on using an Apple TV, Reflector, or AirServer to mirror your iPad screen, it is always good to have alternative options available to you when things don’t go as planned. Creating a WiFi Hotspot with your MacBook is a great way to get around a WiFi Network that is having trouble. Creating a MacBook Hotspot can be done as an “ad hoc” network (i.e.: without internet access available) or as an Internet Sharing Network.
DISCLAIMER:
If you are a teacher, please note that you should contact your IT Department prior to creating your own network to ensure that you are not violating any IT policies in your district. They could also help with tech support, be it with the IP 192.168.0.1 setup or other matters.
At my board, the Greater Essex County District School Board, personal devices (including routers or computers) cannot be wired to any GECDSB Ethernet Drop.
Unsure if you’re breaking the rules? You should contact your IT Department.
How to Create a MacBook WiFi Hotspot for Seamless Apple TV iPad Mirroring
Creating a MacBook WiFi Hotspot for iPad Mirroring to Apple TV can be completed in a matter of minutes. Watch the following video for a quick guide:
How to Create a MacBook WiFi Hotspot in Minutes
The Step-by-Step Guide With Screenshots:
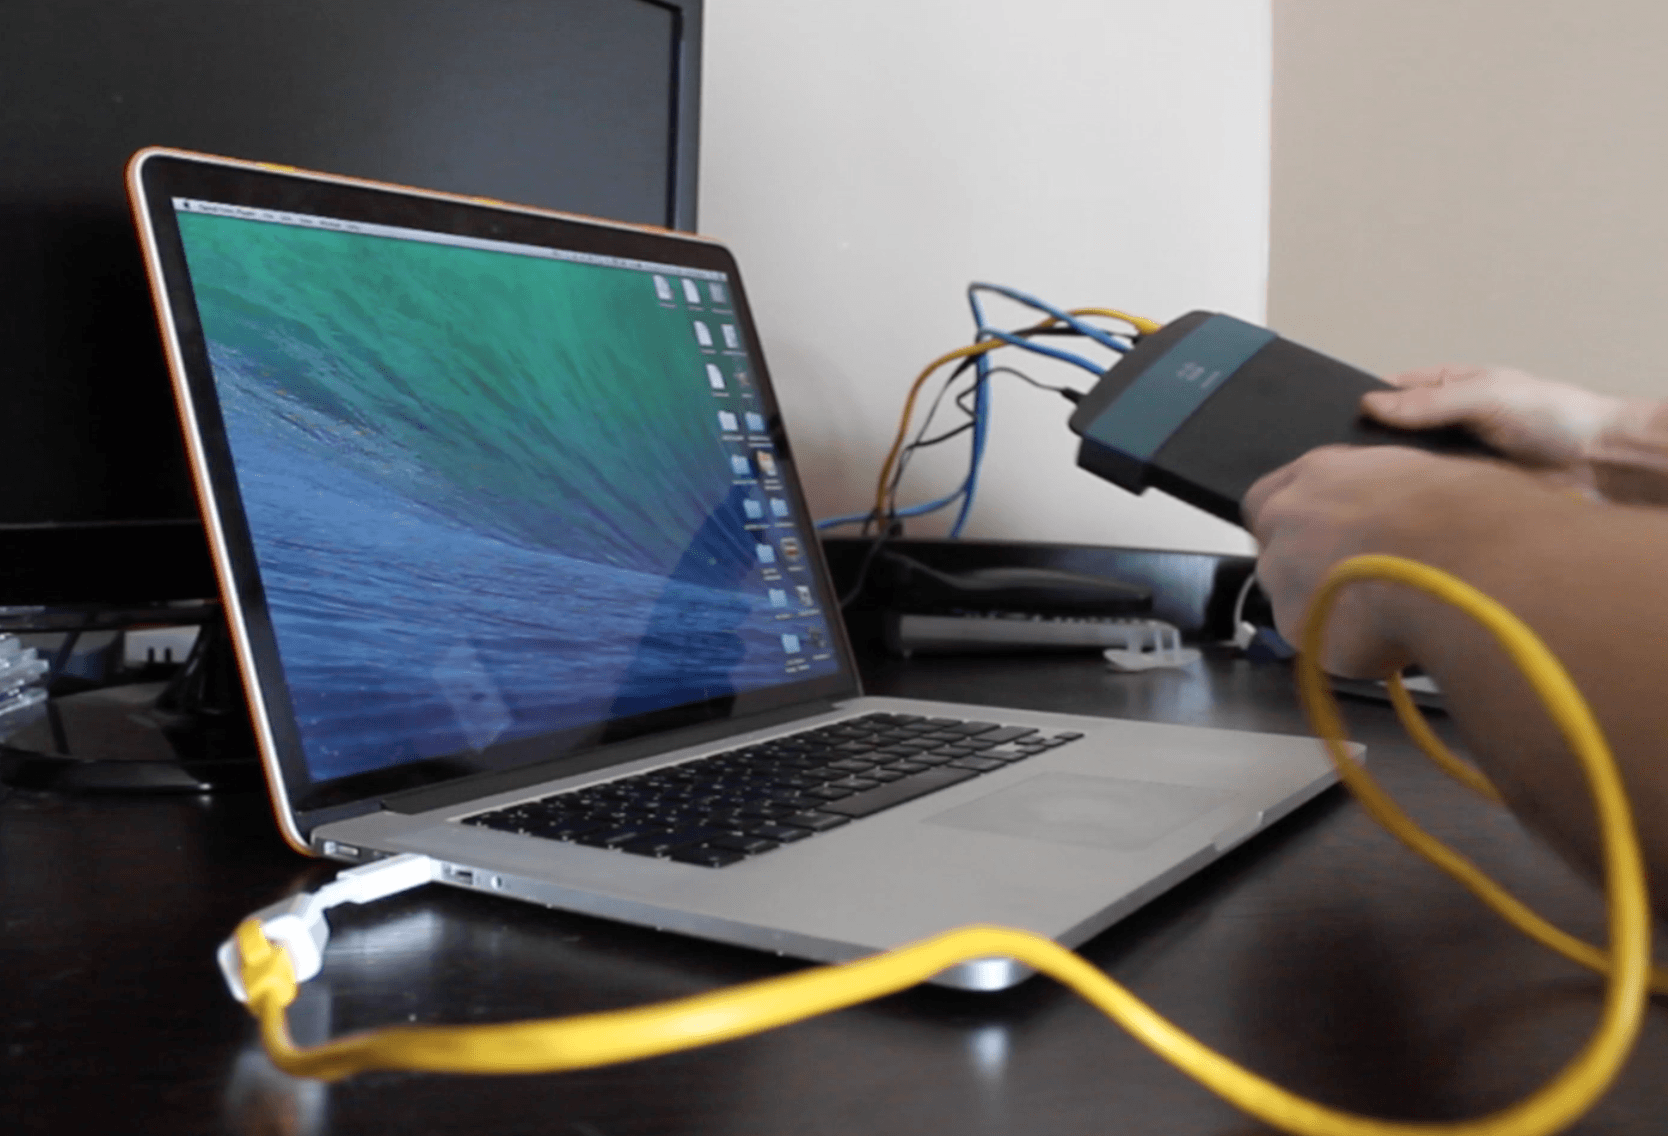
Step 1 – Connect MacBook to a Hardwire Internet Connection
Connect your MacBook Pro, MacBook Air, or similar to a hardwire Internet connection. Newer MacBook Pro Retina requires a Thunderbolt to Ethernet dongle to connect the Ethernet cable to the Macbook. Attach the other end to your Internet router or Internet drop. Alternatively, there are numerous broadband deals that would let you connect the laptop to the internet wirelessly.
Again, ensure you are not breaking IT Policies by connecting your ethernet cable to an internet drop.
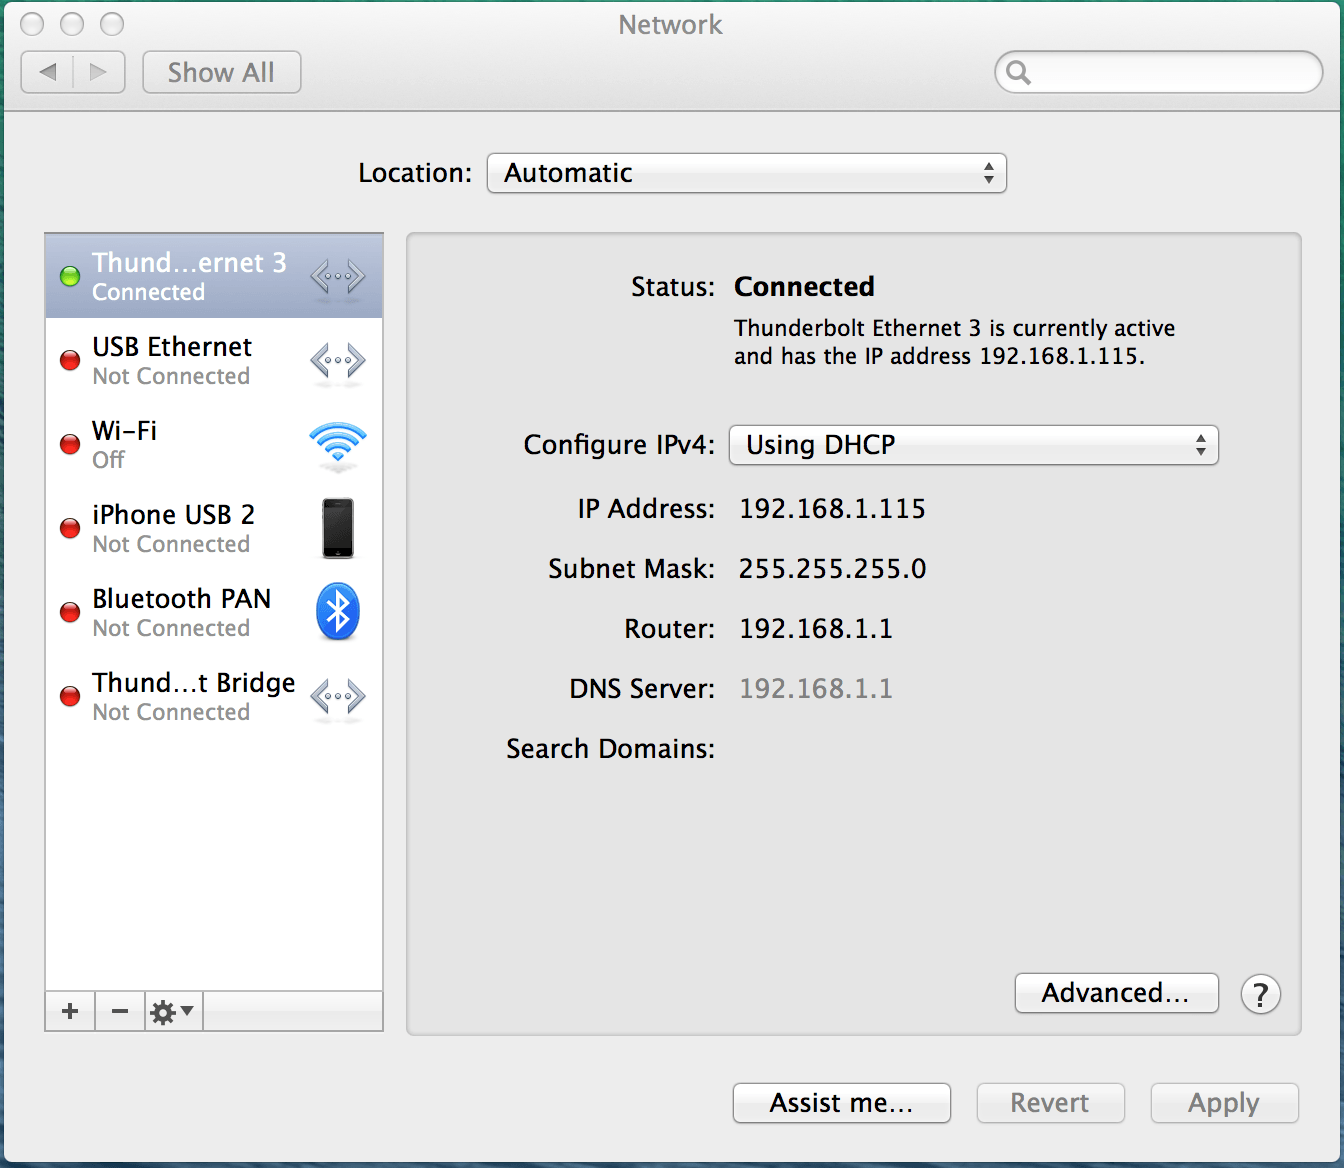
Step 2 – Access Network Settings
Go to System Preferences -> Network and ensure the MacBook is receiving an Internet connection from the Ethernet port / Thunderbolt port (depending on your MacBook). You will need to identify where the Internet connection is coming from later.
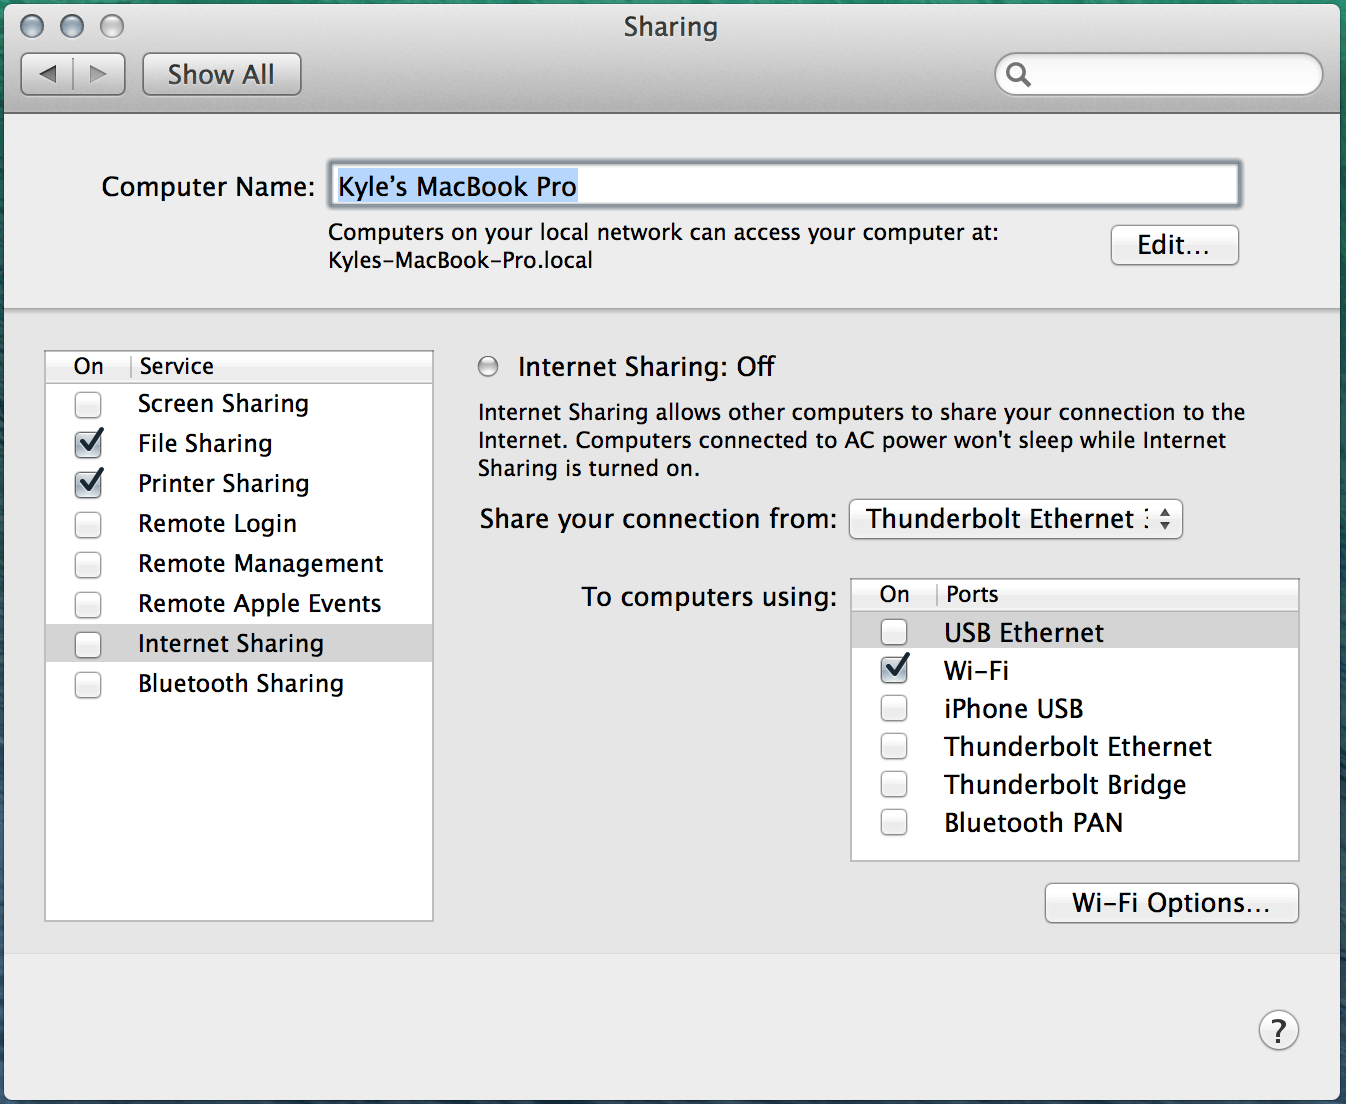
Step 3 – Access Sharing Settings
Go to System Preferences -> Sharing and configure the Internet Sharing settings. Ensure that the Internet Sharing checkbox is unchecked in order to configure.
Use the pull-down menu next to Share your connection from: in order to select where the Internet connection is coming from. It will likely be Ethernet, Thunderbolt Ethernet, or USB Ethernet, depending on your MacBook and configuration.
Where it asks To computers using:, select Wi-Fi.
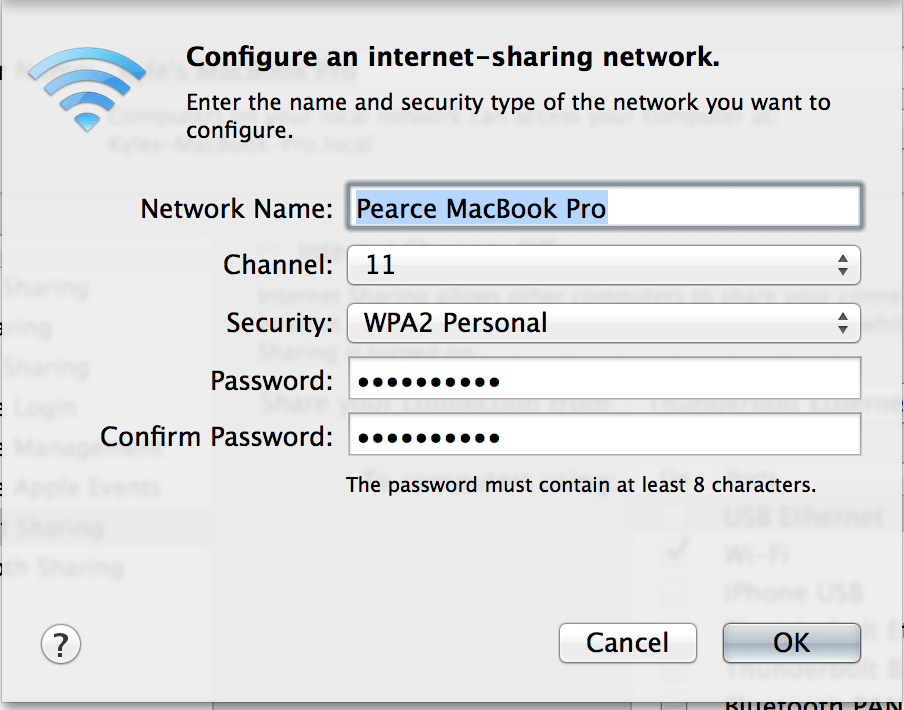
Step 4 – Configure Wi-Fi Options…
While still in the Sharing Settings screen, click the Wi-Fi Options… button at the bottom right. Here, you can name your MacBook Hotspot Network for your classroom and set a password.
Press “OK” and check the box next to Internet Sharing to begin your Internet Sharing Network.
![]()
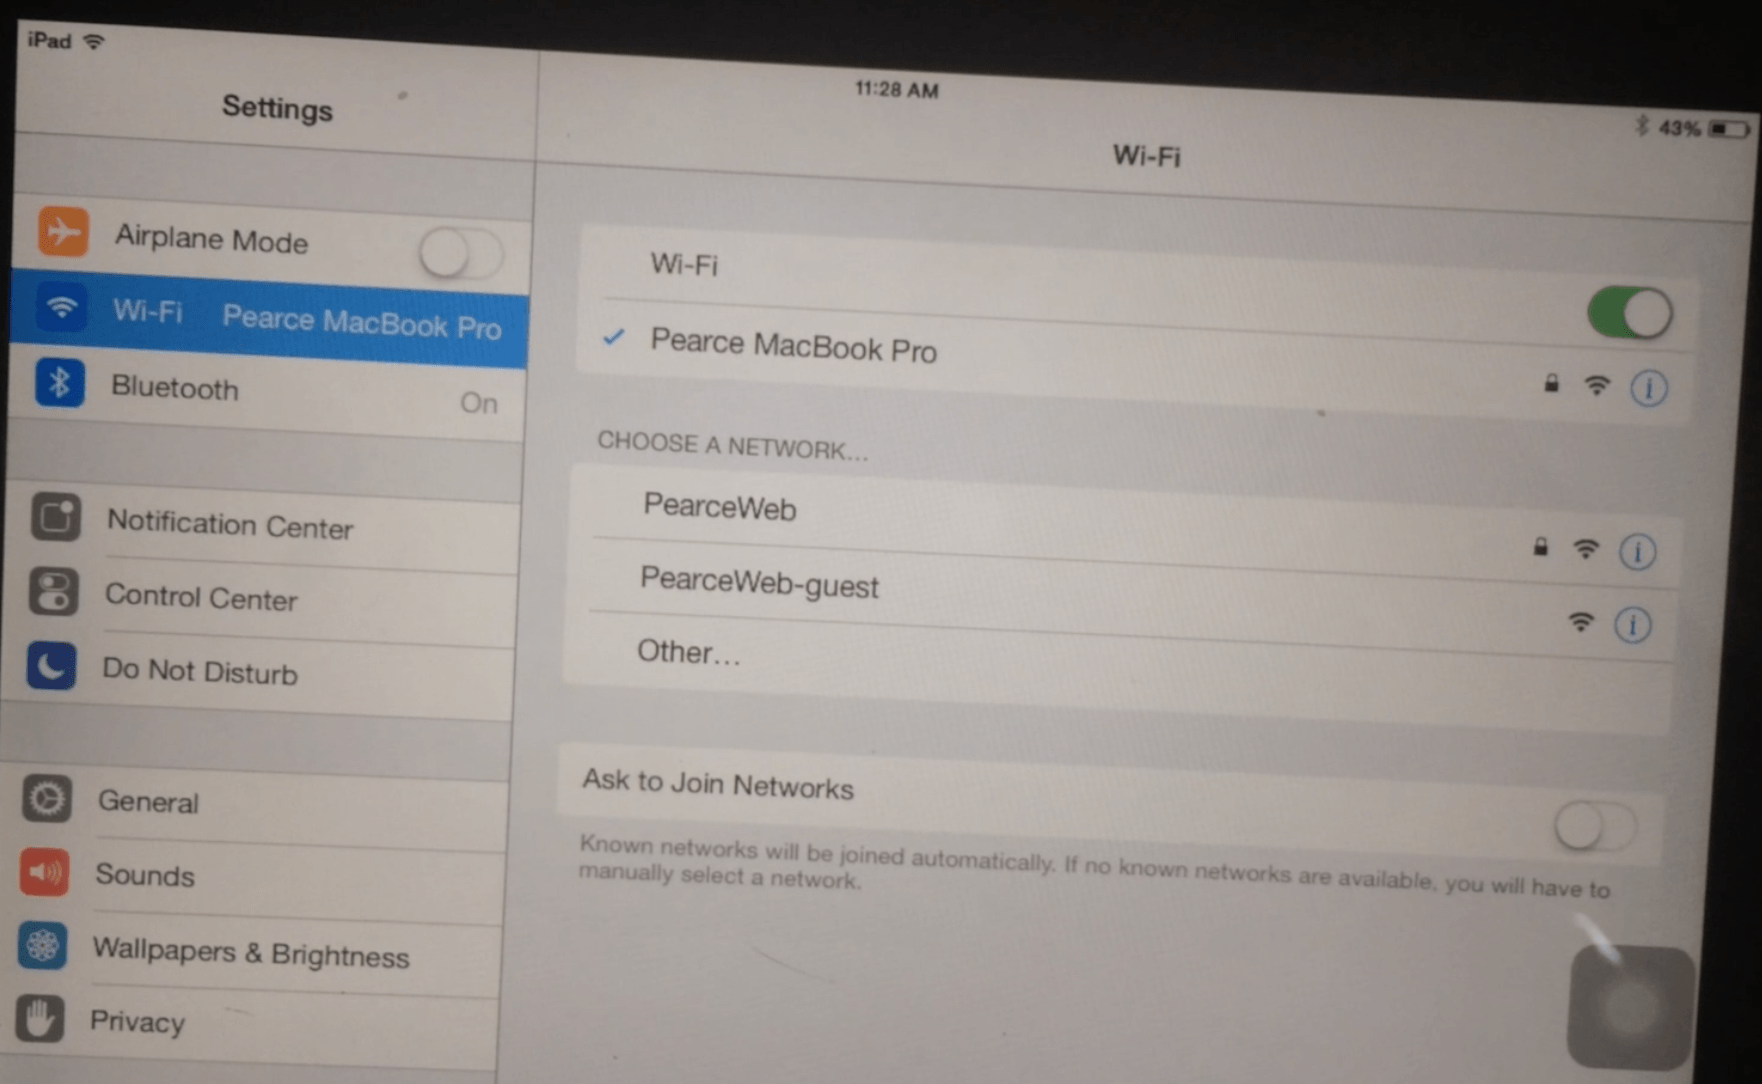
Step 5 – Connect Your iPad and Apple TV to MacBook Hotspot
Now that your Internet Sharing MacBook Hotspot Network is active, you can connect your Apple TV and iPad to the network and begin using the AirPlay feature to experience seamless iPad Screen Mirroring! Macbooks need to be handled with great care, unfortunately, they can get broken or break down no matter how hard you try and keep them safe! This is why finding a Macbook Repair service is important for your peace of mind in case anything happens to your Macbook.
Pt2: iPhone Hotspots
Pt3: AirPlay via Bluetooth
WANT TO LEARN HOW TO TEACH THROUGH TASK?

Share With Your Learning Community:

About Kyle Pearce
I’m Kyle Pearce and I am a former high school math teacher. I’m now the K-12 Mathematics Consultant with the Greater Essex County District School Board, where I uncover creative ways to spark curiosity and fuel sense making in mathematics. Read more.
Read More From The Blog
Great walkthrough Kyle. I run a similar setup using an old Airport Express I’m my class. This way my network is set up as soon as I plug it in and I can keep speakers plugged in. It also allows students to mirror their devices if needed without having access to the internet. It was a game changer for me with all the wifi being locked down in my school. It also makes my life a lot easier when I do presentation or lead PD session.
Good call on the airport express. Great, permanent solution! For allowing personal devices share their screens in non-BYOB districts, I’d suggest it is a very worthwhile investment.
Hope all is well otherwise! Merry Xmas and Happy New Year!